
Before we start, however, I need to break it to you that this is not something I can guarantee you will be able to do right away having read this. You need to know your paper, it's physical limits, how it feels when you cut, how it stretches and bends when it's weak, etc. This is not a beginner's technique. I recommend experimenting with all of these techniques and using them in various combination to find which one works in a given situation. Use the following patterns to cut along with the tips (click on image, then print):


Tip #1: Use thick paper (for beginners)
If you are just starting out with papercutting and you want to try a piece with thin lines, use thicker paper. It will better withstand the stress you will put on it. Ignore this tip if you already have a favorite paper, or have enough experience to be working with thinner papers. I use exclusively Hygloss silhouette paper. I have a special post all about the paper I use here: http://papercutsbyjoe.blogspot.com/2010/02/papercutting-tips-guide-to-paper.html
For illustration purposes, I'm showing this technique on normal printer paper with the patterns above printed directly on the white paper.
Tip #2: Cut lines in order, do not skip!
The first cut is easy, it's like any other cut. It's the second one and all the ones after that gets you. Always cut the next line over, do not skip cuts. It may seem intimidating to cut so closely to your last cut. If you skip a cut, when you return, you will be cutting on a weakened piece of paper and the likelyhood of tearing increases. I know that makes no sense in writing, so here's some photos using the first image.
 First Cut removed, lines indicate where next line should be cut
 Spreading the paper to show second cut
 The rest of the piece is then removed.
Tip #3: Follow with your thumb.
As you cut, you should immediately press your thumb onto the area just cut. This supports the paper preventing tearing, breaking, and stretching. Here's a video:
Tip #4: Leave pieces in for support
Sometimes when cutting a complicated piece like the gate design, you will find that pieces wrap around other pieces and going in sequential order is impossible. In these cases I recommend cutting the piece and either leaving the piece in, or leaving a small portion of the piece uncut so that either way the piece remains in the hole. These left-in pieces help to support the overall structure of your piece while you are cutting nearby delicate areas. The photos below hopefully show what I mean better than I just explained:
 Piece cut, but left inside hole
 Fragile area cut and removed
 First piece removed after fragile area is cut
This tip is great for a long series of parallel cuts. Cut all the vertical cuts in order leaving the horizontal end-cuts intact. Then once all the vertical cuts are finished, go back and cut the ends of the pieces allowing removal.
Tip #5: Built-in Support Structures
Support structures allow for both fragile cuts as well as keeping all your loose parts in place until mounting. I will go through a design and cut in all the support structures BEFORE I begin so I don't forget later.
 Piece held to light to show pre-cut supports in designs
 Cuts removed around delicate areas with support structures holding everything in place and also providing support to keep branch from breaking off during cutting.
Once your piece is mounted, you can cut away the supports.
All together now!
Back to the first design. As I said earlier, no one tip is used when cutting thin lines; I often use all of these in one small area of a piece. As you get more experienced, you will be able to instinctively know which combination will result in the best results, so practice practice practice! Here are some examples of the combination being used in the designs provided here and some of my other pieces
 (Back of paper to show cuts) Support structure and pieces left partially cut to support several parallel cuts
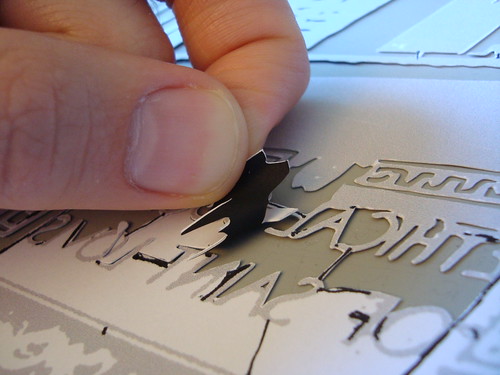 A custom design with text. Hand-drawn supports allow for extremely delicate cuts before mounting.
 Support structure keeping everything in place
 Lots of thin lines here!
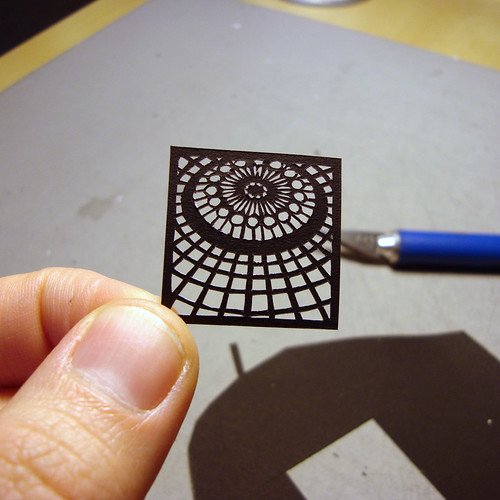 Same principals are used for extremely small cuts as thin lines. Planning and forethought are the most important principals when doing extremely difficult cuts.
I really hope this helps, and I'll be reading the comments to answer any questions that come up!


32 comments:
Oh my, thank you for these tips!
I don't know if I will ever attempt the art of paper cutting, but I just wanted to acknowledge your generosity in taking the time to share these tips with others... Your passion is evident.
Thank you!
Thank you so much. This was most helpful. However, don't your eyes tire quickly cutting from pixelated images such as the scroll, or do you have a way to reduce/eliminate them for your larger pieces?
Your work is fabulous!
When I saw this article in the March 2011 Sunset magazine, I immediately thought of you and your papercuttings.
http://www.sunset.com/home/before-after/vegas-bathroom-makeover-00418000070887/page8.html
Wow! What an incredibly thoughtful and well written post. I especially like your pictures. Very easy to follow. Thanks!
Wow, these are amazing! Thank you for sharing.
Your are very generous with your time and spreading your knowledge. I have done years of intricate scroll saw work and have used your connecting supporting bridges from time-to-time.
Thanks
Dave at mountainbrook.etsy
i love that you want others to be able to do this work also. and i loooove your work.
How beautiful! Love it! I would not have the patience!
You do amazing work and must have the patience of a saint. Although I will never attempt cutting such intricate pieces I still gained some tips that I will try out. Thanks for sharing.
Awesome work.I saw ur work in etsy.Its really great.
Great ! great ! great ! Thank you for sharing ! I will try.
This was a beautifully worded walk through. Thoughtful. Thank you.
I hove searched the web for a while and by far yours is the best tutorial on paper cutting around. Even though a begginer I was able to cut out the first frame on printer paper without tears or jagged edges. Thank you for our generosity and hope your business flourishes.
Chris
You really describe the Slitting Blade and about Press and shear machine.
I appreciate your knowledge on the Slitting Blade that makes this blog useful in the machinery tool, thanks.
Paper Cutting Blade
i want to do a under water world.i got A1 for my sec school exam. want to learn more.
I learnt paper cutting recently. Your tips are soo good that it has given me confidence. thank you :)
Great tips!!!
HI joe. Im Razel Larangan from the philippines. I am currently the president of GUHIT Pinas Quezon City in the philippines. I found your blog so rich and informative. I would like to ask for your permission if I could Share your Inputs and Knowledge to our group. to help and encourage young artist to try and Explore the Art of Paper Cutting.. thank you so much.. you can reach me in this email account. laranganjohnrazel@gmail.com
thanks in advancve
Thank you so much for this informative and helpful post.
تمتع الان معنا على تقدم افضل الخصومات العالمية التى من خللها نعمل على تقدم افضل المميزات الرائعة الان من صيانة بيكو التى لا مثيل لها الان لاننا نعمل على تقدجم افضل العروض الرائعة الان فى قال وقت ممكن وباقل الاسعار الرائعة من صيانة جليم جاز لاننا نعمل على تقدم فضل الخصومات الان من صيانة جولدي التى ندمة الان وباقل الاسعار الراعئة من صيانة جنرال اليكتريك التى نقدمة الان فىق ال وقت ممكن
احصلوا على افضل خدمات الصيانة بأرخص الأسعار الأن من خلال توكيل وايت بوينت و الذي يوفر لكم فريق صيانة محترف يصلكم أينما كنتم فقط تواصلوا معنا لطلب خدماتنا كما يعلن توكيل توشيبا عن خدماته في عالم الصيانة و التي يقدمها لكم بإستخدام قطع الغيار الأصلية و المعتمدة هذا و يعلن توكيل ماجيك شيف عن خدمات الصيانة الاسرع في مصر و التي تصلكم في اسرع وقت ممكن و تحل كافة أعطال أجهزتكم بدقة و سرعة شديدة
نوفر اليكم الان من خلال كوقعنا مجموعة صيانات علي اعلي مستيو الان من خلال صيانة باور توفير افضل متخصصين للصيانات مدربين علي اعلي مستيو الان في اعمال الصيانات و بافضل كفائه توكيل باور الان من خلال موقعنا تواصلو معنا الان
اعمال صيانات الان و علي اعلي مستوي الان من التميز وبافضل كفائه الان و صيانة ال جي العمل الان علي اعلي مستوي الان و اضفل تميز الان في اعمال الصيانات الان و تحت اشراف الان افضل المهندسين و الخبراء تواصلو توكيل ال جي معنا الان و احصل الان علي افضل الصيانات
صيانة الان تلاجات و غسالات و جميع الاجهزه الكهربائيه الان و علي اعلي مستوي صيانة يونيون اير الان من التميز و من خلال افضل مهندسين صيانة حاصلين علي اعلي مستوي الان من الخبره و الكفائه الان تواصلو معنا الان توكيل يونيون اير من خلال موقعنا او من خلال خدمة العملاء الخاصه بنا الان
احصل الان علي افضل صيانات الان و من خلال توفير الان افضل المهندسين الان و علي صيانة كاريير مستوي الان من التميز و بافضل كفائه الان في الصيانات توكيل كاريير المنزليه الان من خلال موقعنا تواصلو معنا الان
صيانات علي اعيل متسوي الان من الكفائه صيانة الاسكا الان وبافضل مستوي الان صيانة الكتروستار من الدقه من خلال افضل مهندسين الان صيانة فريجيدير في الصيانات و بافضل كفائه الان و دقه في الصيانات و التركيب و علي اعلي مستوي تواصلو معنا الان
تعرف الان معنا على تقدم افضل الخصومات العالمية تالتى نقدمة الان من صيانة يونيون اير التى لا مثيل لها الان حيث اننا نعمل على تقدم افضل الخصومات التى نقدجمة الان من توكيل يونيون اير التى من خلالها نعمل على تقدم افضل العروض الرائعة الان من خدمة عملاء يونيون اير التى نقدمة الان
الآن من خلال توكيل امريكول نقدم لكم خدمات ما بعد البيع لراحة أكبر لعملائنا الكرام حيث يوفر لكم فريق صيانة امريكول خدمات الاصلاح و الصيانة الدورية بإستخدام قطع الغيار الأصلية
dfsdfdfsd
Very enjoyable to visit this blog and find something exciting and amazing.
How to Use a Dremel to Cut Glass?
read this above post its very greatful for me thanks sharing this post ,great post.
How to Use a Dremel Tool?
Post a Comment